Quote Cards

Uncategorized

NO copyright infringement intended – I am not making money out of my cards. I do this for fun.

I am a huge Disney fan and think quotes are just perfect for card-making. I have plans for many more movie-inspired cards (they work great at Christmas) but these are my favourites so far.

“Winnie the Pooh” Graduation Card

Winnie the Pooh graduation

This is a very simple card but took ages because I had to assemble a pretty long quote from scratch. Using Milo’s ABCs to do this, I stamped it in 3 sections vertically down the card.

I trimmed around that, leaving enough room for the Congratulations which I die-cut out of dark-blue paper along with adhesive paper. Then I was able to peel off the backing and stick it straight on to my card.

These stamps are from Hobbycraft and only cost 50p-£1 each. Hobbycraft have lots of bargains on clear stamps like these – some of them are exactly the same images as their more-expensive wooden stamps, just a little bit smaller.

Using coloured pencils and Gamsol, I coloured the hat in and did some subtle shading on the scroll. I stuck it all down and voila! A custom-quote graduation card.

“Frozen” Christmas Card

%22Frozen%22 Xmas card

The popularity of Frozen has to be more extreme than any Disney film before it. Even with beloved films like The Lion King, I don’t remember the merchandise being in nearly every shop.

My niece loves Frozen, like most little girls, so this will probably be her Christmas card next year. I wanted to try some partial die-cutting, which I have to admit I struggle with. It took some effort to get the snowflakes how I wanted them.

Then I cut some more snowflakes out of glittery silver paper, and glued them on the white background. Again, I used Milo’s ABCs for this sentiment, though I decided to switch it up and use some more playful alphabet stamps for the word “worth”.

I heat-embossed this  and stuck it on white glitter card, which I then cut around with decorative-edged scissors for a pretty border. I love the wintery feel of the snowflakes along with all the glitter.

Finally I stamped this little snowman head and shaded him with Spectrum Noir pens, before sticking everything down on a blank blue card.

Products Used:

Milo’s ABCs – http://www.lawnfawn.com/products/milos-abcs

“Congratulations” die – http://www.ecraftdesigns.com/collections/dies/products/congratulations-1

Graduation, alphabet and snowman stamps – http://www.hobbycraft.co.uk/

Gamsol – http://www.inkyantics.com/acc1.htm

Spectrum Noir coloured pencils – http://www.ebay.co.uk/itm/like/251754072065?limghlpsr=true&hlpv=2&ops=true&viphx=1&hlpht=true&lpid=108&chn=ps&device=c&adtype=pla&crdt=0&ff3=1&ff11=ICEP3.0.0-L&ff12=67&ff13=80&ff14=108&ff19=0

Adhesive paper – http://www.makethedayspecial.co.uk/shop.php#!/6-x-6-Double-sided-Adhesive-Sheets-5/p/43736701/category=11123782

Big Shot die-cutting machine – http://www.hobbycraft.co.uk/sizzix-big-shot-die-cutting-starter-kit/584439-1000?gclid=CjwKEAiAyMCnBRDa0Pyex-qswB0SJADKNMKAnJPF-V6vnC9Ki-irhlPyLDt5XXQE0QK_Ko9c1cHD5RoCHfHw_wcB

Manly Card Monday #4 – Distressed Balloon

Uncategorized

My card is clean and simple today with a distressed vintage look courtesy of Tim Holtz and some old patterned paper I found in my collection.

I used masking tape around the edges and blended Distress Ink in “Antique Linen”, keeping it darkest at the top and bottom and leaving the middle space mostly free of colour so that I could stamp my sentiment there.

DSCF5138

This “happy birthday” is from a wooden stamp with a car image, so I just selectively stamped the sentiment. After peeling off the masking tape, I was left with this vintage background.

I grabbed the classic balloon shape from the dies showcased in my last post and die-cut from this stripy patterned paper that I thought worked really well against the parchment-like background.

To adhere the string, I first drew where I wanted it to fall in pencil and ran glue along it, carefully using tweezers to adhere the string down along the pencil line.

Before sticking the balloon down with double-sided foam, I also cut out some white card and stuck that behind the shine-mark for added effect.

Products Used:

Tim Holtz Distress Ink “Antique Linen”
http://www.hobbycraft.co.uk/tim-holtz-distress-ink-antique-linen/573401-1000

X Cut balloons die –
https://www.docrafts.com/Products/xcut/large-dies-10pcs-balloons/92377

Lawn Fawn string –
http://www.lawnfawn.com/collections/lawn-trimmings/products/retro-triple-pack-cord

New Buy Alert! – X Cut Balloons Dies

Uncategorized

Although I’ve been making birthday cards for years, I recently realised I don’t have any of the staple balloon dies or stamps that make it so much easier to put together a last-minute birthday card. To remedy this as soon as possible, I ordered these X Cut balloons dies and have been itching to use them.


product

The set comes with 6 different balloons plus strings and  bows. The amount of dies you get for your money is brilliant, but I found there’s really no way to avoid unwanted imprints while using these. The shine marks are attached, so you get an unsightly line from the shine to the outside of the balloon.

I made several cards using the dies and decided to share these ones.

Red & Gold Birthday Balloons

mini birthday card

I cut 3 balloons out of red card and 2 out of gold “happy birthday” patterned paper from my leftovers stash. I stuck some Elizabeth Craft sticky paper on the back of some gold paper and die-cut the strings out, so when I peeled the Elizabeth Craft paper off I was able to adhere it directly on to my card base, trimming off the excess.

Alternating red and gold, I laid down the balloons on top of the strings. As it was a white background, I was able to leave most of the shine marks as they were, but on the two top balloons I had to stick some white card behind them as I didn’t want the other balloons to show through.

Finally I stamped ‘Happy Birthday’ in red ink in the top corner.

Balloons in the Sky Card

birthday card standing birthday card

I blended Distress Ink quite messily over my card, using masking tape to ensure I had a clean edge once I was finished. I was quite rough with this – the only thing I kept in mind was to  keep one space of the card light for sentiment-stamping.

I die-cut 3 strings out of black paper and chose my balloons. I went for the small balloon as I wanted the effect of it being further away. While I was choosing patterned paper, I came across this starry paper from a Tiny Tatty Teddies paper pack and thought it would be perfect for party balloons.

I stuck white card behind all of the shine marks to stop the blue background showing through. When I was adhering everything I tried to add to the effect of the higher balloons being further away, so I stuck the top balloon down with double-sided tape, used one layer of foam adhesive for the middle balloon and 2 layers for the one at the bottom. Finally I stamped my sentiment in black ink.

Products Used

X Cut large dies – balloons – http://www.amazon.co.uk/Docrafts-10-Piece-Balloons-Carbonised-Steel/dp/B00NEXMTQ8/ref=sr_1_2?ie=UTF8&qid=1424557733&sr=8-2&keywords=xcut+dies+balloons

Elizabeth Craft Designs adhesive paper – http://www.ecraftdesigns.com/collections/double-sided-adhesive/products/elizabeths-transparent-double-sided-tape-sheet-8-5-x-11-5-pack

Tiny Tatty Teddies paper pack – http://www.ebay.co.uk/itm/like/191493408928?limghlpsr=true&hlpv=2&ops=true&viphx=1&hlpht=true&lpid=108&chn=ps&device=c&adtype=pla&crdt=0&ff3=1&ff11=ICEP3.0.0-L&ff12=67&ff13=80&ff14=108&ff19=0

“Sorry You’re Leaving” Tag

Uncategorized

My friend is leaving work this week and I haven’t felt up to making a card. So I decided to make her a tag to go on her leaving present instead. After cats, her favourite animal is an octopus, so I put Lawn Fawn’s “Critters in the Sea” in the spotlight.

DSCF5093 DSCF5098

Firstly, I stamped the octopus on stripy pink paper from the Let’s Polka collection. I heat-embossed him to make him nice and bold on the patterned paper and got to work fussy-cutting.

Then I die-cut one gift-tag from plain card and one from patterned vellum. This vellum has little swirls on it that are almost like seashells so it worked well for this ocean theme.

The waves are stamped in Distress Ink, but this can be a bit full-on so I decided not to put it on my project until I had already stamped it on some scrap paper off to the side. Next, I took the “just waving hello” sentiment as well as Milo’s Alphabet stamps, and stamped only the ‘just waving’ part, spelling BYE underneath.

I cut the vellum into a banner and foam-adhered the octopus. Then I hole-punched some leftover patterned paper and stuck the white tag on top, so I could cut around it to make a border. Lastly, I threaded yellow baker’s twine through – I love the pink and yellow together.

I also stamped “Sorry you’re leaving” on the back in those same alphabet stamps, but I didn’t think to take a picture – sorry!

Products Used:

Gift tag die –
http://www.averyelle.com/die-gift-tags-elle-ments/

Let’s Polka paper pad –http://www.makethedayspecial.co.uk/shop.php#!/Lets-Polka-6×6-Paper-Pad/p/33128625/category=10168036

‘Just waving’ sentiment, octopus and waves stamps –http://www.lawnfawn.com/products/critters-in-the-sea

Alphabet stamps –
http://www.lawnfawn.com/products/milos-abcs

Baker’s twine –
http://www.ebay.co.uk/itm/like/251823245054?limghlpsr=true&hlpv=2&ops=true&viphx=1&hlpht=true&lpid=108&chn=ps&device=c&adtype=pla&crdt=0&ff3=1&ff11=ICEP3.0.0-L&ff12=67&ff13=80&ff14=108&ff19=0

Decorative edged scissors –
http://www.amazon.co.uk/Fiskars-Pinking-Paper-Edger-Pink/dp/B000MARFWO/ref=sr_1_4?s=kitchen&ie=UTF8&qid=1424200971&sr=1-4&keywords=fiskars+scissors+decorative

Distress Ink “Peacock Feathers” –
http://www.simonsaysstamp.com/product.aspx?id=107249&c=0

Manly Card Monday #3 – Footballs

Uncategorized

I NEVER read newspapers – so I was very naive when I set about making this card. I figured I could cut out a big square of text and it would look great! It never occurred to me how many pictures there are.

I took the scissors to the Sports section first. Maybe most people just use any old story, but I was quite careful about what I cut out. I snipped away at “Dear Deirdre” for humorous cards and have stowed away some articles about Ofsted and Brooklyn Beckham being “too cool for school” for school-themed cards.

I cut some card a bit smaller than my blank, and began gluing the pieces down.

DSCF5100

Taking some textured blue card that I thought went well with the almost rustic look, I heat embossed this sentiment in bright white and adhered, wrapping some twine around to keep the edges looking cleaner.

Lastly, I stamped the football 5 times and die-cut with a circle die that fits nicely around it. You could play around with the placement but I like them overlapping like this.

Sorry for the length of time between posts this week – I was burnt out but am excited about some new products so will be back with those soon.

Products Used:

Football clear stamp –
http://www.hobbycraft.co.uk/hobbycraft-mini-clear-stamp-football/562552-1038

Textured blue paper –https://www.theglitterpot.co.uk/products/Me_To_You_Tiny_Tatty_Teddy_Boy_6_x_6_Paper_Pack/46485/2490

Wow embossing powder –
http://www.ebay.co.uk/itm/like/131414612398?limghlpsr=true&hlpv=2&ops=true&viphx=1&hlpht=true&lpid=108&chn=ps&device=c&adtype=pla&crdt=0&ff3=1&ff11=ICEP3.0.0-L&ff12=67&ff13=80&ff14=108&ff19=0

Watermark Versamark ink –http://www.craftydevilspapercraft.co.uk/versamark-pad.ir?cName=stamping-ink-pads-and-pens-versamark

Brown twine –
http://www.lawnfawn.com/collections/lawn-trimmings/products/retro-triple-pack-cord

Manly Card Monday #2 – Oscar Wilde

Uncategorized

Not every man likes fishing, cars, football and gardening. I’d be offended if women’s cards only ever showcased saucepans, sewing needles and lipstick, so let’s branch out!

There’s nothing wrong with a hobby card as long as the man you’re giving the card to actually enjoys that hobby. But I’m trying to think more about masculine colour schemes and layouts rather than embellishments.

DSCF5020

First, the background: I used masking tape around the card to keep it in place and get that nice clean white edge. Then I started to blend Tim Holtz Distress Ink in ‘Peacock Feathers’ all over, keeping the darker parts at the top and the bottom.

The great thing with Distress Inks is how they react with water. I used a paintbrush to flick some water over the ink and dabbed at it with tissue to leave this blotchy effect behind. Then I hurried the drying process along with my heat tool and peeled off the masking tape.

The embellishment in the middle is the fiddly bit. It takes a lot of die-cutting and at one point my Big Shot handle flew all the way across the room!

I ran the Lawn Fawn stitched journaling card through my Big Shot a grand total of 4 times – once with patterned paper and thrice with white card. I cut two of these in half – the patterned one and one plain one.

The two plain ones left intact are backing sheets to keep the embellishment secure. I took 1 patterned half and 1 plain and stuck it over one of the backing sheets. I then put that to one side and got out my alphabet dies.

I lined the remaining halves up and stuck them to my final intact card. Then I taped down my die and ran it all through my machine. Then I stamped just the “wishes” from a “Birthday Wishes” clear stamp.

Using foam pads for dimension, I adhered this to my other half-and-half card. Then I took some white cotton, wrapped it around until I was happy with the look and glued on a button to top it all off.

Before sticking everything down, I took some ribbon that I’ve been dying to use. It has this Oscar Wilde quote:

“I can resist anything, except temptation”. A card for the cultured man in your life!

Products Used

Tim Holtz Distress Ink “Peacock Feathers” –https://www.etsy.com/uk/listing/220595700/tim-holtz-mini-distress-ink-pad-peacock?utm_source=google&utm_medium=product_listing_promoted_en_gb&utm_campaign=supplies-everything_else&gclid=Cj0KEQiAr9ymBRDdqYrH6Mj5170BEiQAcRUsiwIjtYNshhI1Cyp8pnWXEa3bx3PmiY8XKQcnHMxzqg8aAl_z8P8HAQ

Blending tool –
http://www.ebay.co.uk/itm/like/281570523620?limghlpsr=true&hlpv=2&ops=true&viphx=1&hlpht=true&lpid=108&chn=ps&device=c&adtype=pla&crdt=0&ff3=1&ff11=ICEP3.0.0-L&ff12=67&ff13=80&ff14=108&ff19=0

“Let’s Polka” paper pad –
http://www.lawnfawn.com/products/lets-polka-petite-paper-pack

Stitched journalling card die –
http://www.lawnfawn.com/products/stitched-journaling-card

Cole’s ABCs –
http://www.lawnfawn.com/products/cole-s-abcs

Oscar Wilde quote ribbon –
http://www.ebay.co.uk/itm/Oscar-Wilde-I-can-resist-everything-except-temptation-Ribbon-Colour-Choice-/190884030898

Curiosity Corner button –
http://www.hotshotcraft.co.uk/catalog/dovecraft-curiosity-corner-plastic-buttons-p-2715.html

Double Sayings stamps –
http://www.amazon.co.uk/gp/product/B005LBDDW0?psc=1&redirect=true&ref_=oh_aui_detailpage_o00_s00

Muse Challenge – Circle Card

Uncategorized

This Muse Challenge caught my eye straight away because I LOVE circle cards. I’m new to these challenges so don’t know if there are any rules as to who can take part, but if I’m not allowed I’m sure they’ll let me know!

I saw these paper flowers in a magazine recently and wanted to give them a go, so decided to combine the two. You can have a go at this week’s challenge here: http://musecardclub.blogspot.ca/2015/02/muse-challenge-103.html

DSCF5083

I used a large circle die to cut down my square card, leaving it hanging a little off the top so that it still folds.

Then I took a circle die 2 sizes smaller than the one I just used and cut 6 circles of this pink mulberry paper. I trimmed each of the circles to be more petal-shaped and slit each of them with scissors. I slotted them all against each other and secured with glue.

I glued the button down to hide all the messy parts, and then curled up the sides to make it look more like a flower (it didn’t look much like one before I did this!). Then I grabbed the first stamp I ever bought, a rose with four leaves. Selectively stamping the leaves in green Versamark ink, I cut them out with scissors leaving a white border around them.

I took the next size up out of my circle dies and cut this white circle to stick the flower on to, then adhered the leaves. I cut some more pink paper the same size as my blank card and stuck it all down.

I was tempted to leave it as it was, but I wanted to be a bit more in keeping with the Muse card. So I die-cut the word ‘thanks’ out of patterned paper, having first stuck down some adhesive paper so that it cut out sticky and I could just peel it off to adhere to the card. I left it hanging off the edge a little so it stands up better.

You could use this design for all kinds of occasions. It’d be lovely for Mother’s Day, birthdays or Valentine’s. I’ll definitely be duplicating this one.

Products Used

Mulberry paper –
http://www.ebay.co.uk/itm/like/121451114092?limghlpsr=true&hlpv=2&ops=true&viphx=1&hlpht=true&lpid=108&chn=ps&device=c&adtype=pla&crdt=0&ff3=1&ff11=ICEP3.0.0-L&ff12=67&ff13=80&ff14=108&ff19=0

Dovecraft Curiosity Corner buttons –
http://www.ebay.co.uk/itm/like/191063513423?limghlpsr=true&hlpv=2&ops=true&viphx=1&hlpht=true&lpid=108&chn=ps&device=c&adtype=pla&crdt=0&ff3=1&ff11=ICEP3.0.0-L&ff12=67&ff13=80&ff14=108&ff19=0

Rose stamps – (I can’t find the one I’ve got but these look similar)
http://www.amazon.co.uk/Silicone-Stamps-14×18-Rose-sheet/dp/B009ZSCH7W/ref=sr_1_6?ie=UTF8&qid=1423425548&sr=8-6&keywords=rose+stamp

X Cut circle dies – https://www.theglitterpot.co.uk/products/X_Cut_Nesting_Dies_Circle/24630/1395

Scripty Thanks die –
http://www.craftie-charlie.co.uk/lawn-fawn-cuts-scripty-thanks-universal-custom-craft-cutting-dies-lf690.html

Sketch Saturday #347 – 40th Birthday Card

Uncategorized

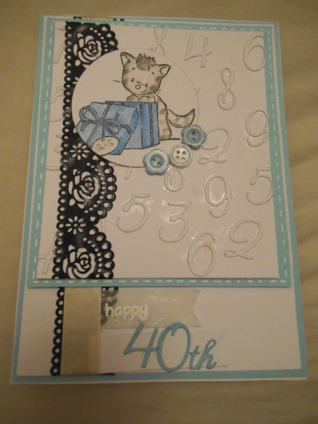
My sister is 40 in May so I bought these number dies to get it done nice and early. I was inspired by this week’s sketch from the Sketch Saturday challenge blog here: http://sketchsaturday.blogspot.co.uk

DSCF5079

If you stick white die-cuts on white card you get a faux-embossed effect that I really love, so I cut a bunch of numbers and glued them down. Then I stuck it on this blue paper and created false stitches with a white gel pen.

The sketch has a vertical line down the right side so I grabbed this lace-effect sticker from my stash and stuck it on the white background. I did a second larger background to stick on my blank card and decided to have this cream ribbon running down the lace on that one.

I didn’t really want two overt banners on the card so I embossed the word “happy” on vellum to keep it subtle. I cut “40th” from blue card and stuck it on a white banner at the bottom.

Finally, it was time to choose an image for the circular part of the sketch. My sister loves cats and has two tabbys so I chose this cat from a Bentley Bear “thank you” stamp set. I masked out the word “thanks” and wrote “Sis” there instead, having already coloured the image with Spectrum Noir pencils.

DSCF5078

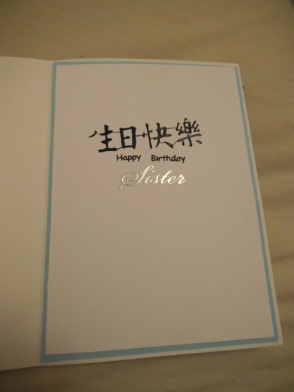
I popped these blue buttons on and set to work on the inside, layering white card on top of another piece of blue card cut slightly smaller than the inside of the card. I embossed the word “Sister” in silver embossing powder then dug out this Chinese “happy birthday” sentiment from my collection.

I think she’ll like it. Hope you do too!

Products Used

Self-adhesive black lace –
http://www.hobbycraft.co.uk/hobbycraft-adhesive-lace-black-1mtr/597127-1000

Bentley Bear “Thank You” Stamp Set –
http://www.ebay.co.uk/itm/Craft-clear-out-Bently-Bear-Thank-You-Collection-stamp-set-/371249778374

Number dies –
http://www.ebay.co.uk/itm/261532160983?_trksid=p2059210.m2749.l2649&ssPageName=STRK%3AMEBIDX%3AIT

Lawn Fawn Critters in the Snow stamps –
http://www.makethedayspecial.co.uk/shop.php#!/Critters-in-the-Snow/p/12011398

Female relations stamps –
http://www.ebay.co.uk/itm/PAPERMANIA-MALE-AND-FEMALE-RELATIONS-37-PIECE-CLEAR-STAMP-SET-CARD-MAKING-NEW-/310946026292

The Chinese peel-off sentiments are from my local craft shop and I don’t have the packaging so can’t find the brand. If I work out where to get it I will share.

New Buy Alert! – Spectrum Noir Coloured Pencils

Uncategorized
DSCF5059

Hobbycraft “Cheers” stamp coloured with Spectrum Noir pencils and Gamsol

I’m still finding my feet with colouring – I can’t grasp Copics and am an un-talented painter. I’m delving into the realm of coloured pencils to see if I can get more out of them than I did when I was a kid.

Why Spectrum Noir? I already use and like their pens, I haven’t heard any bad reviews about their products and they sell sets of pencils designed to blend together.

My 3 main concerns when using a new product:

  • Can I use it?
  • Can I use it for more than one technique/occasion etc?
  • Was it worth parting with my money?

Can I use Spectrum Noir Essentials coloured pencils?

Most people have played with colouring pencils at some point in their life and would agree that they are easy to use. The Spectrum Noir pencils go on the paper much more smoothly and thickly than your average stationery-shop pencils.

Can I use Spectrum Noir Essentials pencils for more than one occasion/technique etc?

Obviously, you can use any colouring products on more than one occasion, but what about techniques? The set comes with a guide on the different techniques, showing you how you can use a blending product such as Gamsol, or rub the blending pencil (or the white pencil that comes with the set) over your coloured image. You can also use the pencils on their own as they are made for blending, but I liked using the white pencil best as it smoothed everything out as well as highlighting areas.

Were Spectrum Noir Essentials pencils worth parting with my money?

The set was £15-20 in several shops and websites, and I wasn’t willing to pay that. I held out and eventually got the set for £13.50 from eBay – not a huge saving, but it makes all the difference. I am definitely pleased with the set for that price, but I think if I was more of an illustrator/artist I would probably want a better quality, more intense pencil.

Overall rating and why:

7/10

This helped build up my collection quickly and for a reasonable price. I was hoping for more intense colours but as I am only using them for card-making it isn’t a problem, and they are easy to blend together, especially with Gamsol. All in all, so far so good!

Get Well Card

DSCF5069DSCF5067

The first thing I want to do with any new product is make a card, and not long after the pencils arrived I also got a free stamp set with a magazine so took advantage and made this Get Well card.

I embossed the jar image and coloured the whole thing with Spectrum Noir pencils, keeping the darker colours at the edges for a shading effect, then covered the orange part of the jar in 3D clear gloss.

The label stamp is from the set I featured on the Valentine’s Day card in my last post. I used masking tape to hide the “Hope, Love and Happiness” sentiment and I would just have the square border.

I drew a cross with the black pencil but there wasn’t a bright red in the collection so I used a red Spectrum Noir marker to colour the cross, then I adhered the label with foam tape (no, I wasn’t patient enough to wait for the clear gloss to dry – I hurried the process along with my heat tool) so it sticks up more. I then took this orange patterned paper from my collection and cut down a little bit smaller than my blank card. I stamped “Especially for You” in clear ink and embossed with bright white Wow embossing powder.

I stuck everything down with foam tape and stamped “Get Well Soon” on the inside of the card.

Products Used

Spectrum Noir Professional Coloured Pencils – Essentials –
http://www.ebay.co.uk/itm/281581117955?_trksid=p2059210.m2749.l2648&var=580592833742&ssPageName=STRK%3AMEBIDX%3AIT

“Cheers” wooden stamp –
http://www.hobbycraft.co.uk

Clearly Besotted Stamps set –
http://www.clearlybesottedstamps.com/collections/stamps

Crafty Impressions Double Sayings stamp set –
http://www.amazon.co.uk/gp/product/B00JWPCIOA?psc=1&redirect=true&ref_=oh_aui_detailpage_o01_s00

Gamsol –
http://www.amazon.co.uk/gp/product/B005P1UZEA?psc=1&redirect=true&ref_=oh_aui_detailpage_o00_s00

The patterned paper is old so I’m afraid I can’t point you in its direction, I haven’t a clue where it came from.

Valentine’s Day Shaker Card

Uncategorized

Jam-jar style stamps are around a lot right now. I got this stamp set for under £6 from Amazon – 3 different styles of jar plus labels!

DSCF5051 DSCF5030

All I knew when I began this card was that I wanted a Distress Ink background. Everything else was completely spontaneous!

Don’t be put off by a slightly higher price – there are so many techniques for Distress Inks. They react with water to create some cool effects. My way of creating a water-stained background is very simple – I just use my blending tool to cover the paper in the ink, keeping it darkest at the bottom by packing on more ink there, and then a paintbrush to flick droplets of water over it.

You can leave it to dry or dab the droplets with a tissue, which I do because I’m impatient. Once you’re happy, use a heat tool to help it along. It won’t be sopping wet so you can still work with it, but make sure it’s dry before moving on.

(You get the clean edge around the background by securing it with masking tape before you start inking. Make sure you take away some of the tape’s stickiness first so it doesn’t tear the paper when peeling off.)

I stamped a jar on white card as well as vellum, embossed them with clear powder and then fussy-cut them both out. This just means cutting them out with scissors rather than coordinating dies (as far as I know there aren’t any coordinating dies for these stamps).

The reason I used vellum was because I was thinking of making a shaker card. The end result doesn’t really shake but I like the fact that the card has a little pouch with things in it. You could always write a message to your loved one and put that in the jar for them to pull out.

I put very thin double-sided tape around the edge of the vellum jar. Because it’s so thin, you can’t really see the adhesive at all. I didn’t put any at the top so I could drop sequins into the jar rather than it being completely sealed up. It’s too compact for the sequins to fall out.

i also die-cut some gold hearts but they were too big for the shaker, so I stuck one on the front of the jar and used tweezers to tease the one in the jar into a position where you can still tell it’s a heart. I felt something was missing so tied some white cotton around the top of the jar in a bow.

Finally I stuck it on the front and stamped my sentiment in Versamark clear ink and embossed with silver powder.

I’m really pleased with this card and am going to try to experiment more with shakers. Let me know what you think!

Products Used

Crafty Impressions A6 Jars and Labels stamps –

http://www.amazon.co.uk/gp/product/B00JWPCIOA?psc=1&redirect=true&ref_=oh_aui_detailpage_o01_s00

Tim Holtz Distress Ink in “peacock feathers” –

http://www.hobbycraft.co.uk/tim-holtz-distress-ink-pad-peacock-feathers-blue/591463-1001

Papermania vellum paper pad –

http://www.kaboodle.com/reviews/paper-mania-exquisite-vellum-collection

Lawn Fawn “My Silly Valentine” stamps –

http://www.lawnfawn.com/products/my-silly-valentine (USA)

http://www.makethedayspecial.co.uk/shop.php#!/My-Silly-Valentine/p/12011446 (UK)

Versamark watermark ink pad –

http://www.amazon.co.uk/Tsukineko-Versamark-Watermark-Ink-Pad/dp/B001DKMBTO/ref=sr_1_1?ie=UTF8&qid=1423090497&sr=8-1&keywords=versamark+ink

Ranger blending tool –

http://www.amazon.co.uk/Ranger-Ink-Blending-Tool-Brown/dp/B001685FR8/ref=sr_1_2?ie=UTF8&qid=1423093194&sr=8-2&keywords=ranger+blending+tool